
Building a raised garden bed is one of the most effective upgrades you can make to a home garden. It improves soil structure, drainage, root health, and long-term productivity — while also making gardening easier on your back and knees.
This how to build a raised garden bed guide is written as a practical, no-fluff DIY tutorial. It focuses on decisions that actually matter: correct dimensions, safe materials, soil layering, drainage logic, and common mistakes that cause raised beds to fail after one or two seasons.
Whether you are starting a new garden or upgrading poor ground soil, this method works across climates when adapted correctly.
Why Raised Garden Beds Work Better Than Ground-Level Beds
A raised garden bed creates a controlled growing environment. Instead of fighting compacted or nutrient-poor native soil, you build a custom soil system from the ground up.
Key advantages include:
- improved drainage and aeration,
- faster soil warming in spring,
- better root development,
- reduced weed pressure,
- clearer nutrient management,
- easier maintenance and harvesting.
When built correctly, a raised bed becomes more productive each year instead of degrading.
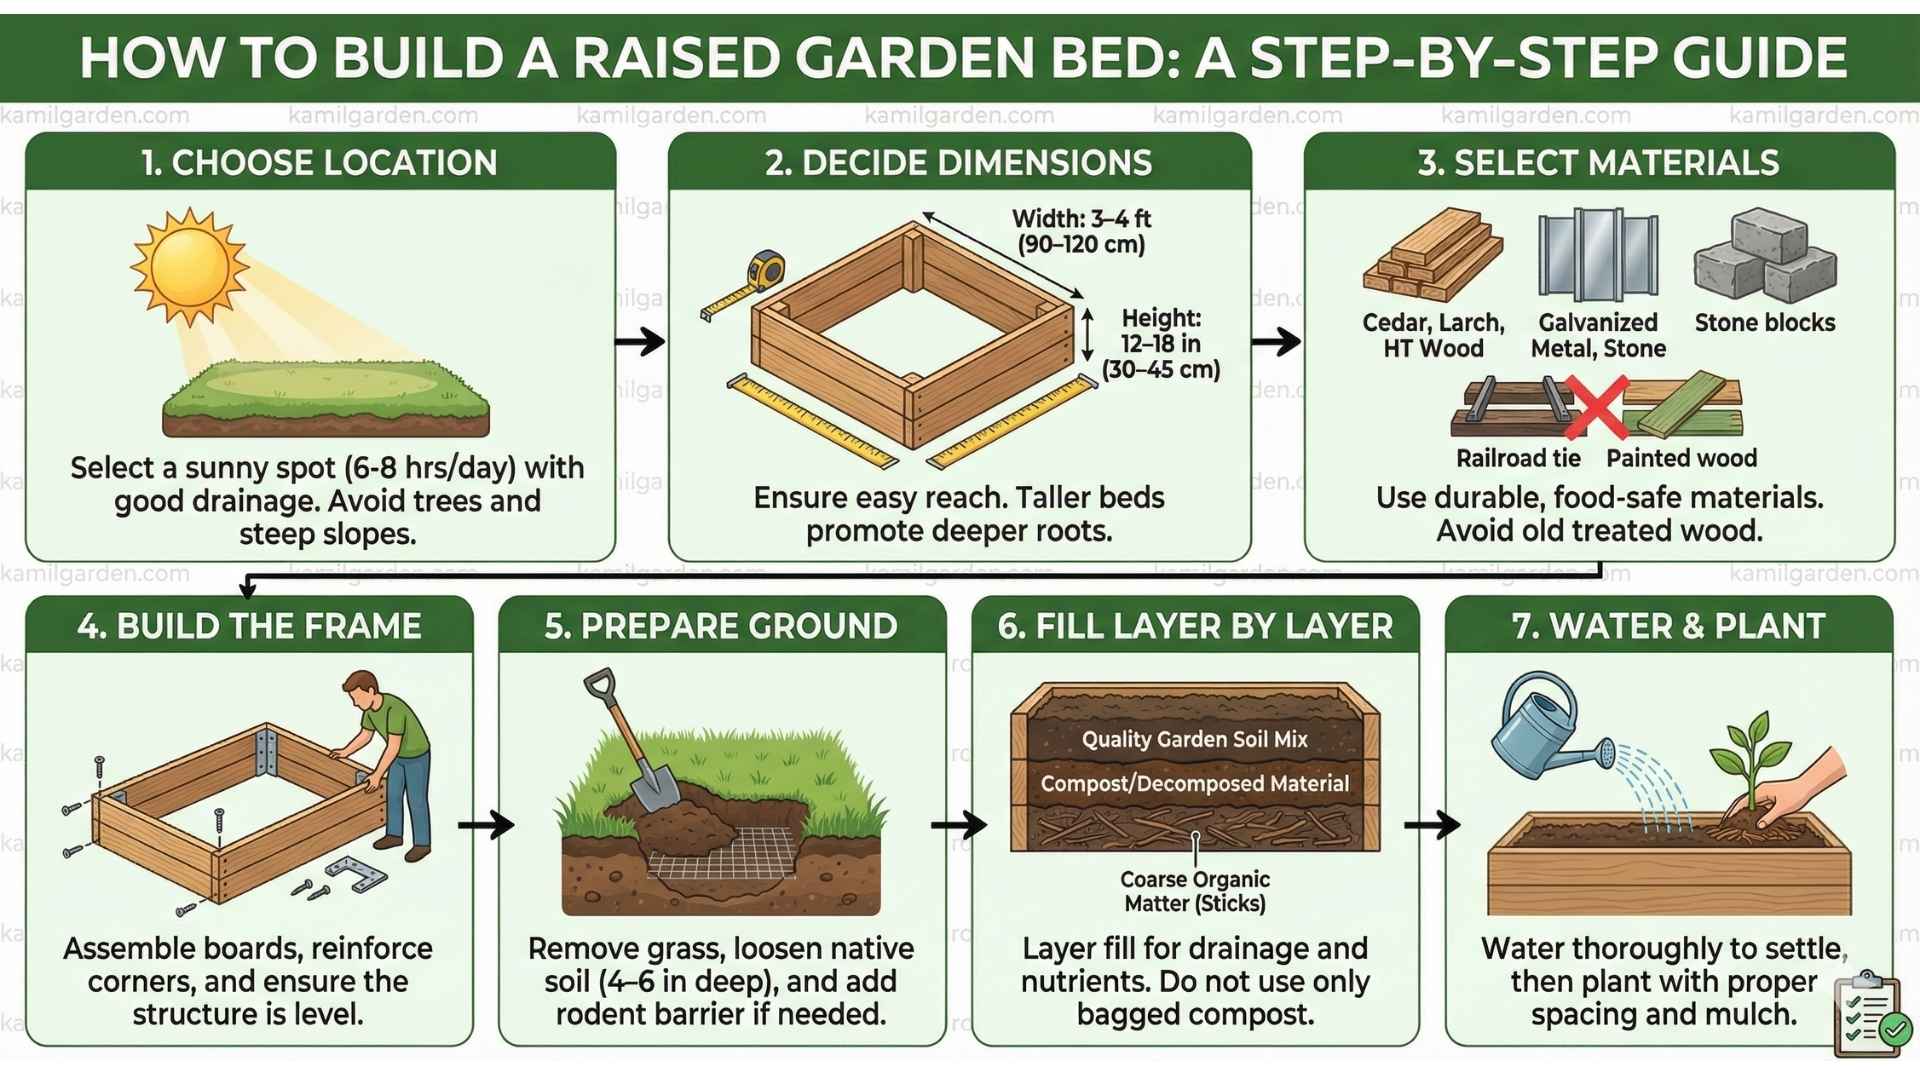
Step 1: Choose the Right Location
Before cutting wood or buying soil, location determines success.
A raised garden bed should receive:
- at least 6–8 hours of direct sunlight per day,
- good airflow to reduce disease,
- access to water,
- level ground (or close to level).
Avoid placing beds under trees or near large shrubs, which compete aggressively for water and nutrients. If the ground slopes, level the area or terrace properly — do not rely on soil alone to compensate.
Step 2: Decide on Ideal Raised Bed Dimensions
Correct dimensions matter more than most beginners realize.
Recommended dimensions
- Width: 90–120 cm (3–4 ft)
Wide enough for good yield, narrow enough to reach the center without stepping inside. - Length: 120–240 cm (4–8 ft)
Any length works, but longer beds require stronger corner reinforcement. - Height:
- 20–30 cm (8–12 in): minimum functional height
- 30–45 cm (12–18 in): ideal for most vegetables
- 45+ cm (18+ in): best for root crops or poor native soil
Taller beds drain better, warm faster, and allow deeper root systems — but require more fill material.
Step 3: Choose Safe and Durable Materials
Material choice determines lifespan and food safety.
Best materials for raised garden beds
- untreated hardwood (shorter lifespan, safe),
- heat-treated lumber (marked HT),
- cedar or larch (naturally rot-resistant),
- galvanized metal panels (long lifespan, modern look),
- stone or concrete blocks (permanent solution).
Materials to avoid
- pressure-treated wood made before modern safety standards,
- railroad ties,
- painted or coated scrap wood,
- plastics not rated for outdoor or food use.
Longevity matters. A bed that collapses in three years costs more than one built correctly once.
Step 4: Build the Raised Bed Frame
Assembly should prioritize strength and squareness.
- Cut boards to size.
- Assemble the rectangle on flat ground.
- Reinforce corners with internal brackets or posts.
- Check that corners are square before tightening.
- For long beds, add a center brace to prevent bowing.
If building taller beds, stack boards carefully and secure each layer to prevent separation over time.
Step 5: Prepare the Ground Beneath the Bed
Never place a raised bed directly on grass or compacted soil without preparation.
- Remove turf completely.
- Loosen the soil beneath to a depth of at least 10–15 cm (4–6 in).
- If rodents are an issue, install wire mesh at the base.
- Cardboard can be placed as a temporary weed barrier.
This step allows roots to penetrate downward and prevents drainage problems later.
Step 6: Fill the Raised Garden Bed the Right Way
Filling is where many raised beds fail.
The correct soil layering approach
Bottom layer (optional, tall beds only):
- coarse organic matter (sticks, woody debris),
- improves drainage and long-term structure.
Middle layer:
- composted plant material,
- partially decomposed organic matter,
- improves nutrient availability.
Top layer (most important):
- high-quality garden soil mixed with mature compost,
- this is where roots grow and nutrients are absorbed.
Avoid filling the entire bed with bagged compost alone — it collapses and creates nutrient imbalance over time.
Step 7: Water and Let the Bed Settle
After filling:
- water thoroughly,
- allow soil to settle for 24–48 hours,
- top up as needed.
Soil settling is normal. A well-built raised bed may lose 5–10 cm (2–4 in) of height in the first weeks.
Step 8: Plant Strategically for Best Results
Raised beds allow tighter spacing — but not overcrowding.
- Follow plant spacing guidelines.
- Use succession planting to maximize output.
- Group crops with similar water needs.
- Mulch after planting to stabilize moisture.
Raised beds reward planning more than improvisation.
Common Mistakes When Building Raised Garden Beds
- Making beds too wide to reach.
- Using unsafe or short-lived materials.
- Ignoring ground preparation.
- Overfilling with compost only.
- Skipping corner reinforcement.
- Forgetting long-term soil health.
Most raised bed failures come from shortcuts taken at the start.
Table: Raised Garden Bed Build Overview
| Stage | Key Decision | Why It Matters | Common Error |
|---|---|---|---|
| Location | Sun exposure | Drives plant growth | Shaded placement |
| Dimensions | Reachable width | Prevents soil compaction | Too wide beds |
| Materials | Food-safe durability | Longevity and safety | Treated wood misuse |
| Soil Fill | Layered structure | Root health | Pure compost fill |
| Maintenance | Mulching and top-ups | Long-term fertility | Ignoring soil settling |
How Long Does a Raised Garden Bed Last?
- untreated softwood: 3–5 years,
- hardwood or cedar: 7–15 years,
- metal or stone: 20+ years.
Soil quality improves every year if organic matter is added regularly and beds are not compacted.
FAQ – How to Build a Raised Garden Bed
1. What is the best wood for a raised garden bed?
Naturally rot-resistant woods like cedar or larch last longest without chemical treatment.
2. How deep should a raised garden bed be?
At least 20–30 cm for most vegetables; deeper beds perform better.
3. Can I place a raised bed on grass?
Yes, but grass must be removed and soil loosened first.
4. Do raised beds need drainage holes?
No. Proper soil layering and open ground underneath provide drainage.
5. Is lining a raised bed necessary?
Only for rodent protection or specific soil concerns.
6. Can I use bagged soil only?
Not recommended. Mixing soil with compost creates better structure.
7. How often should soil be replaced?
Soil is maintained, not replaced — add compost annually.
8. Are raised beds good for beginners?
Yes. They reduce many common gardening problems.
9. Can raised beds be built in winter?
Yes, as long as the ground is workable.
10. What grows best in raised beds?
Vegetables, herbs, and shallow-rooted fruits all perform exceptionally well.
Discussion (0)
No comments yet. Be the first to start the conversation!
Leave a Reply